And Now for Something Sweet!

Okay, okay, I know I shared something sweet yesterday, but I wanted to give you a grown-up recipe this time! And I’m betting that everyone, children and grown-ups alike, will like this one, even if you haven’t liked it in the past.

I’m sure most of you are familiar with Italian dessert Tiramisu. It’s one that is native to the Veneto region of Italy.  The word literally translates to “pick-me up,” “cheer me up,” or “lift me up.” Unfortunately, I’m sure most of you are also used to either the store bought kind, or a bad facsimile of the real deal. And none of those will do anything of the sort.

I’ve tried dozens of recipes, some using (gasp) store bought vanilla pudding to approximate the custard filling, and others using cream cheese. Nasty nasty nasty.

Tiramisu should be silky smooth, set like a traditional vanilla custard, not too sweet and not too heavy.  I know that sounds like an oxymoron, especially given the very rich ingredients, but you need a slight hand and here is that word that my friend Drina hates to hear, you need patience.  Yes, folks, the best tiramisu relies on a French term, Sabayon, in order to create the best filling. You need a light hand when you are creating it so as to not over beat the egg and sugar mixture while it’s heating on the stove. Don’t worry, we will go over this shortly.

This recipe also calls for whipped cream, preferably the kind you make yourself in your trusty stand mixer. Or in a chilled bowl with a whisk. I like to assign this task to the child that’s been the naughtiest that day. I’m kidding.  You can use pre-made whipped cream, just drop the overall sugar in the custard filling from a cup to about 3/4 a cup, or you will get too sweet of a taste.

Once you’ve got the hang of the Sabayon and the whipped cream, you will be an expert at this fancy looking dessert in no time. And imagine the looks on your friends’ and family’s faces when you present them with this masterpiece!

Let’s get this rolling!

The Absolute Best Tiramisu

(Recipe courtesy of Chef Dennis)

Ingredients:

• 6 large egg yolks

• 1 cup sugar (3/4 cup if using prepared whipped cream)

• 1 1/4 cup mascarpone cheese – room temperature

• 1 3/4 cup heavy whipping cream

• 2 -7 oz packages Italian Lady fingers (Savoiardi)

• 1 cup cold espresso or strong coffee

• 1/2 cup coffee flavored Liqueur optional OR rum extract

• 1 ounce cocoa for dusting

INSTRUCTIONS

Combine egg yolks and sugar in the top of a double boiler, over boiling water. Reduce  heat to low, and cook for about 10 minutes, stirring constantly. This is your sabayon, remove from the heat and whip yolks until thick and lemon-colored.  Allow to cool briefly before mixing in mascarpone. Here is the before

img_1505.jpg

And After

img_1507.jpg

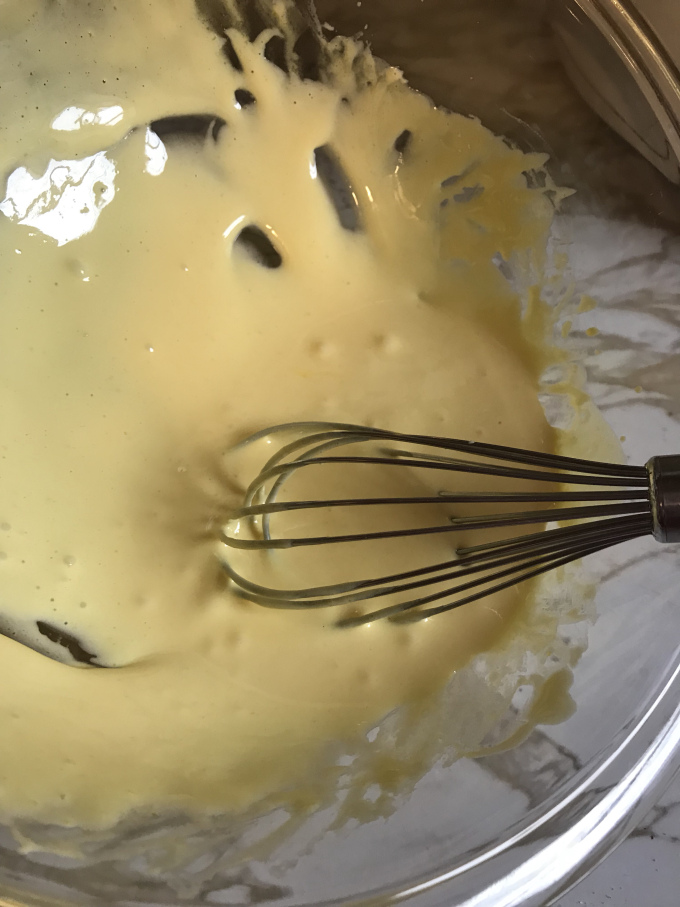
Add Mascarpone to whipped yolks, beat until combined.

Cover with cling wrap (to avoid creating a “skin” on top of the custard) and chill for at least 1 hour. This will also help thicken up the custard.

In a separate bowl, whip cream to stiff peaks.

Gently fold the whipped cream in the mascarpone sabayon mixture and set aside. The     mascarpone does not have to be at room temperature, but it will help it mix in easier if it is.  Take it out of the refrigerator as you gather ingredients to make the recipe.

Mix the cold espresso with the coffee liquor OR rum extract and dip the lady fingers into the mixture just long enough to get them wet, but do not soak them!

Arrange the lady fingers in the bottom of a 9 inch square baking dish (or container similarly sized)

Spoon half the mascarpone cream filling over the lady fingers.

Repeat process with another layer of lady fingers

add another layer of tiramisu cream

Refrigerate 4 hours or overnight.

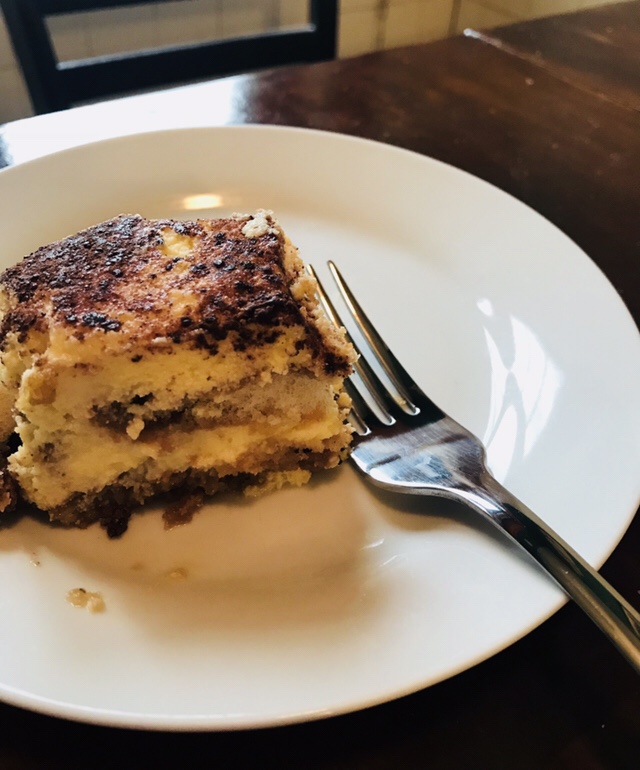
Dust with cocoa before serving and ENJOY!!!

NOTE:  If there is any dish or dessert that you’d like me to share, by all means, drop me a note here. I will respond asap.

I’ll have another dessert for you sometime this week for my absolutely decadent Hazeltnut Truffle Cheesecake.  In the meantime, Buon Appetito!!

Saturday Breakast

The picture above doesn’t do justice to the delicious breakfast the kids just got to enjoy.

I’m the mom of 2 girls, and “stepmom” to 2 amazing boys. And boy howdy, those kids like to eat. Especially on Saturday mornings. Usually I treat them to either homemade chocolate chip pancakes or waffles, but every so often I whip up the breakfast they really want, a Dutch Baby.

Some of you may be asking, “Chris, what is a Dutch Baby?” I’d explain that it is one of the simplest but grandest breakfast treats you can make for your kids, family or friends. It’s a 4 ingredient spectacular wonder that when cooked, becomes a warm, puffed up pancake.

You can serve it plain, with powdered sugar, cinnamon sugar, or my kids’ favorite – sautéed apples with cinnamon, butter and brown sugar.

I was introduced to this yummy treat a few years back when my sister Cathy was visiting. It took me a couple of attempts at making this to get the true puffiness the pancake begs for. With a little bit of patience and a piping hot oven I think you will agree, this is one breakfast you don’t want to miss! I hope you try this sometime this weekend. Enjoy!

Dutch Baby

  • 1/2 cup milk
  • 1/2 cup flour
  • 1/4 cup sugar
  • 2 eggs, room temperature
  • 2 Tbsp butter

Preheat your oven to 425. Mix the first 4 ingredients and blend until smooth. In a 10″ oven-proof sauté pan, melt the butter until it is bubbling. Pour the batter into the pan and cook, undisturbed, on the stove top for 1 minute.

Put the pan into the oven and let cook 12-15 minutes until puffed and golden in color. Remove from the oven and slide onto a plate. Sprinkle with powdered sugar and serve.

Note: you can also serve this with sautéed apples. Just dice 1-2 apples, and squeeze a bit of lemon juice on top. In a sauté pan, melt 2 Tbsp butter and 2 Tbsp brown sugar. Add apples and a few dashes of cinnamon and cook until desired consistency. Serve warm over your Dutch Baby and enjoy!

Lazy

So as I was saying yesterday, I’ve been spending an inordinate amount of time during this holiday season/lack of employment period searching out old recipes I wanted to revisit, as well as new ones.

One thing you need to know about me is my love for soup – ANY kind of soup, cream, broth, chowder, you name it – and Bread. Oh thank the Heavens above I am not the recipient of gluten allergies (sorry to those of you who are). I could literally live on bread and soup alone. And with a few minor ingredients lying around your house, almost anything can become soup.

And bread. I had the opportunity a few years back to stumble onto a no-knead bread that you baked in the oven in a Dutch Oven, creating (supposedly) this deep, crisp crust.

The problem was, mine never came out that way. I mean, it was good, just not great. Until now.

My lovely and uber talented friend/work buddy Flora posted a no knead bread recipe in her amazing blog, The Urban Domestic Diva, and it got me revisiting some of the recipes I had tried already. I finally realized why my bread failed to achieve that incredible crust; I hadn’t let the dough just sit. I mean really, really sit.

So yesterday after starting my other two recipes that I shared with you, I attempted once again to create the crusty, heavenly bread with little to no effort. This meant making the dough yesterday mid-day and letting it sit, untouched on my counter, overnight. Popped it in the oven this morning and O.M.G. THIS is the bread I aspired to create. Crusty, chewy. Delicious. 4 ingredients. 18 hours + cooking time.

Trust me. Try this bread. Make yourself have patience. It’s truly worth it. And then share this with your favorite soup and your favorite people. They will thank you. Your tummy will thank you.

No-Knead Bread

(Recipe courtesy of JoCooks.com)

• 3 cups all-purpose flour

• 1 3/4 tsp salt

• 1/2 tsp active dry yeast

• 1 1/2 cups water room temperature

Directions

1 In a big bowl mix the flour, salt and yeast together. Pour water into the bowl and using a spatula or a wooden spoon mix it until well incorporated.

2 Cover the bowl with plastic wrap and let it sit on your counter for 12 to 18 hours. It should look like this

3 Preheat oven to 450 F degrees. Add your cast iron pot to the oven as it’s heating and heat it as well until it’s at 450 F degrees.

4 Remove the pot from the oven and remove the lid from it. If you want to make sure your bread doesn’t stick to the pot you can sprinkle some flour or cornmeal on the bottom of the pot.

5 Flour your hands really well and also sprinkle a bit of flour over the dough. With your floured hands gently remove the dough from the bowl and roughly shape it into a ball. Take the ball of dough and drop it into the pot. Cover the pot with the lid and place it back in the oven.

6 Bake for 30 minutes with the lid on, after which remove the lid and bake for another 15 to 20 minutes until golden brown.

7 Remove the bread from the pot, it should fall out easily. Let cool completely before slicing into it and serving.

Winter Break

Seems like a good time to get “back on the horse,” so to speak, and relaunch my blog. Hard to believe it’s been a year since my last post.

What have I been doing, you may ask? What haven’t I been doing is a better question. Last year I started a new job, lost my father after a 4-1/2 year battle with liver cancer, moved myself and my girls back to the city to live with the love of my life, and actually enjoyed living for a while. I was able to help acclimate my girls to their new neighborhood and adjust to their new schools while showing them some of the Best that Chicago has to offer: street fests, North Avenue Beach, the “El…” Okay, maybe not that last thing, but they have managed to navigate our fair city via our expansive train and bus system. So they have that going for them. Which is nice.

Then, of course, I lost said Job due to the loss of our main client (whatever) and have been busy trying to re-imagine myself as something. Whatever that is, I’ll let you know when I figure it out.

In the meantime, I’m back to my crazy cooking, trying new AND old recipes, re-imagining and adapting food I’ve tried elsewhere, and keeping myself and my expanded family happy. It’s a big job, but I’m fully up to the challenge!

For your dining pleasure, I’m keeping today’s recipes relatively simple and hearty to accompany the nasty cold snap we seem to all be experiencing. Minestrone soup and rosemary herb focaccia. Both can be made nine ways to Sunday, but I like to think that my recipes have a bit more “punch” to them. The only caveat is you should really let the minestrone sit in your fridge overnight to let all of the flavors meld.

So, without further ado, here are my two recipes for you to create and enjoy!

Focaccia

  • 1 package active rise yeast
  • 3 Tbsp sugar
  • 2 cups all purpose flour
  • 3 Tbsp warm water
  • 1-1/2 tsp salt
  • 5 Tbsp butter, melted and cooled
  • 1 cup milk, heated to 105
  • 1 large egg
  • 1-1/2 – 2 cups all purpose flour
  • Olive oil to coat bowl

Mix sugar, yeast and warm water in a small bowl and let proof 5-10 minutes, or until frothy. In large bowl, mix milk, butter and egg. Add yeast mixture. Add salt and 2 cups flour until well incorporated. Gradually add additional flour and knead until dough is slightly tacky, and smooth, about 10 minutes. Add oil to bowl and roll dough ball in oil to coat. Place plastic wrap and then a kitchen towel over the bowl and set in a warm spot. Allow dough to double in size. Punch down dough and let rest 30 more minutes. Grease the bottom of a jelly roll pan liberally with olive oil. Place dough in pan, stretching and pushing into all four corners. With your finger, make indentations across the dough every inch or so. Cover with plastic wrap and let sit for an additional 30 minutes. Preheat oven to 425. Remove plastic wrap and generously drizzle olive oil over the top of the bread. Sprinkle course sea salt, rosemary and any other herbs (if you want) over the top. Place sheet pan in the oven and cook for 25 minutes or until the top is a nice golden brown. Let cool and slice into pieces for serving. Yields approximately 12-16 pieces, depending on how you cut it

Minestrone

  • 1/4 pound pancetta, diced
  • 1 medium onion, diced
  • 3 cloves garlic, minced
  • 2 stalks celery, diced
  • 1 carton chicken stock
  • 1 carton vegetable stock
  • 1 can whole plum tomatoes, broken into small pieces with liquid
  • 1 can cannelloni beans with liquid
  • Bunch of Swiss chard, cut/torn into small pieces
  • 1-2 carrots, diced
  • 1 medium red potato, peeled and diced
  • 1 cup green beans, diced
  • 1 can red kidney beans, drained
  • 1/2 cup small shell pasta
  • Salt and pepper to taste
  • 1 Parmesan Cheese rind OR 1/4 finely grated Parmesan
  • 1-2 tsp red pepper flakes

Start by drizzling some olive oil into a large Dutch oven and add diced pancetta. Cook for 2-3 minutes and then add the onion and garlic. Cook until onion starts to get translucent, about 3 minutes. Add the celery, carrots, green beans and potato and cook for approximately 5 minutes. Add the chicken and veggie stock and the can of tomatoes and liquid, stir, and then add the Swiss chard. Let this simmer for about 5-10 minutes until the chard starts to wilt. Add both types of beans to the pot and stir. Add salt and pepper to taste, and the red pepper flakes along with the grated cheese. Let this go for a good 10 minutes, stirring to make sure nothing is sticking to the bottom of the pot. Add the pasta and simmer for another 10-20 minutes. Refrigerate overnight, and have this hearty meal for lunch or dinner tomorrow!Yields about 8 or so bowls of soup. NOTE: when you are sautéing with olive oil, try to use the “regular” grade of olive oil, not extra virgin. Save the expensive stuff for when you want to taste the oil, don’t waste the good oil. And don’t forget to tell them Rocco sent you!